Catching up with October art – 3 of 8

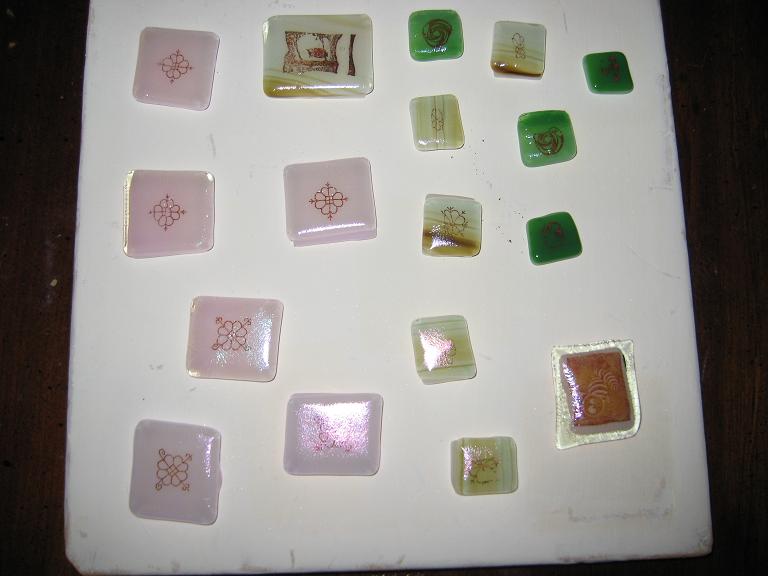
Here’s the “before” shot of some glass I fused in order to play with that lap grinder that I used to be afraid to plug in and use:

aaaand…. I can’t find the “after some progress” image….. but the “after” was going to attempt to show how I’d used the lap grinder to shape these in to some shapes other than lumpy rectangles (I beveled a few, one turned in to an octagon, etc.) They’re still not done yet as there’s some undertermined amount of polishing required to do to get them all shiny again. Perhaps that’ll be a January project.

Apples & flat lap grinders…. all else is temporarily on hold.

I bought a flat lap grinder last week and only just today got around to assembling it. It took a while (there are screws that are threaded so that they loosen to the right…. doh!) and I’m going to be honest with you —- after turning it on and off a couple of times and watching the motor spin so fast that the whole machine kind of sidled & practically jumped sideways on my countertop, I’m a little scared of using the thing. But I will. I just need to step out and pick up some distilled water for it before trying anything.

In other news, I don’t think I should be allowed to go to any produce farms with 11 frogs. I thought I learned my lesson with the tomato insanity business earlier this summer, but no.

You see, I now have 49 pounds of apples to process…
😮

Photo fusing attempt #2 = partial success

BEFORE:

AFTER:

Next time I think I can have 100% success if I:
– stick to single-color glass (the ones with the multiple colors mixed together melt at different temps resulting in the wavy/distorted photo transfers… I think)

Reasons why I think even my next one might still not be 100% success:
– I don’t *want* to stick to single-color glass
– I still have temperature/speed experiments in mind

Next week we will see: hotel art.

Photo Transfers on glass. Attempt #1 = FAIL

BEFORE:

Going in to the kiln:

AFTER:

Well. I partially burned out the photo transfers and now I have blobs of slightly dirty looking melted glass that I don’t know what to do with. However, I also now have a better idea of how that kiln fires (i.e. how fast it heats up at different settings), so I’m trying again tonight.

oh also – just for the record, all of those images on there are straight off of random internets sites and not my own. And that clear orange turned a lovely shade of bright bright red.

Cabinet knobs

Fused glass epoxied on to wooden shapes:

Still need to:
– stain the knobs
– cut & attach the threaded stick (name?) so that there’s something with which to attach the knob to the furniture
– refinish the furniture. ha ha. as if.

but no. really. even if i don’t refinish the furniture, I want to finish these knobs so I can see if this is anything that might be worth making for the new kitchen doors on the new kitchen shelves that I’ll be getting someday.

grinding glass

I am half done with the grinding stage of the window I’m working on. It’s nolonger safe to walk around in my kitchen w/out shoes on (don’t worry – all food has been moved to be out of range of flying glass particles), but here’s what it looks like when it’s ground down to actually fit together nicely:

Here’s what’s still left to work on:

I’m kind of excited about this project again now 🙂

March marbles

Amazing what a little dramatic lighting can do…. these marbles were going to be called something like “an assortment of some of the ugliest marbles I’ve ever made”… HOWEVER…. the angle of the flash seems to have caught some of them in a way that makes them very interesting to me…. too bad they’re not always this sparkly when holding them in my hand in real life…. you can click on the picture to see a close-up, if you like.

I’m still expecting at least 3 more of them to fall apart at any given moment. I did not do a great job of annealing them and there are a whole lot of stress fractures in these that are just waiting to explode. But it’s nice to have now used the little kiln (not the one that needs reqiring – the big kiln is still unusable) twice and not be as afraid of burning down my garage 😉

Next steps: Use fewer colors and pick the ones i *do* use more carefully. Several of these just look “muddy”.

February window, continued

Tuesday night (since mardi gras festivities were cancelled due to a host who was feeling under the weather) I got *this* far:

Two (of five) colors are cut.

Now, however, I’m reconsidering going entirely clear…. there are parts here that I think might be pretty nice to put in color…. maybe…. good thing I won’t have time to work on this until Sunday. That should be enough time to let the color ideas swirl around into a decision.

the beginning of the window….

Sunday I picked up my long-lost sketchbook and picked out one of my favorite designs for the window…. Monday I got this far:

Created 2 copies of a life-size drawing of the window & picked out glass:

Originally I was going to cut one of the drawings apart to use as a template but I realized that since this window is going to be a combination of many different kinds of clear glass, I can just put the glass on top of the pattern and trace it right on the glass. Yay! Several steps easier!

Started cutting glass:

Note: the bar in my basement is extremely comfortable for this. The height is a very nice working height. I may move future art nights downstairs – especially while it’s still dark and cold and wintry outside.